3D Walkthrough SketchUp Mechanical & Electrical Layout -Part Plan
Fire Protection, HVAC Heating Ventilation and Air-Conditioning, Plumbing and Drainage
Power, Lighting, Fire Protection, Security
How to create a welded joint between two pipes in Google Sketchup. The welded bead is quite easy with this technique.
Google SketchUp - Pipe
How to make a quarter pipe in Google Sketch up
A small stair park created with Google SketchUp. -Upper Pipes -8 stair tripleset with downrail and launching ramp -2 stair set -4 stair doubleset with downledge and klinked ledge -lower pipe
I am tring to draw steel mesh with wire cable for architectural use.
The steet bar is woven, so I know that I draw circle and pull it to
make a straight wire, but I don't know how to make it curved or do I
just combine the arc and the straight wire?
If anyone know how to make a curving pipe, please let me know.
Thank you very much.
There is a ruby plugin called "pipe along path". Layout your wires
shape, select it and hit the plugin. It asks for dimensions and does
instantly. I've used it for drawing a complex pully & wire rope
system.
jgb
wow, that is a great tool! Thank you very much.
This helped me a lot!!!
Wow, I like Sketchup, cause SketchUp is very helpful for my work...Google SketchUp actually helps you visualize constructing the project, while you make the project drawing. Because you can view the drawing in 360 degrees, you can view all aspects of the project's anatomy. SketchUp is very helpful for creating cohesive, well organized and visually compelling drawings for the fabricator and the client.
Daniel Ketchum got a BA at East Carolina University and where he also attended graduate school. Later, he taught history and humanities. Ketchum is experienced in 2D and 3D graphic programs, including Photoshop, Poser, Hexagon and primarily writes on these topics. He is a contributor to sites like Renderosity and Animotions.
By Daniel Ketchum, eHow Contributor
updated: May 05, 2010
Use SketchUp to add pipes to your design.
SketchUp is a free 3D CAD modeling program offered by Google. It is often used for creating models of houses, buildings and other architectural structures. These models can then be used for business or architectural presentations or exported for sale to graphic artists and animators who use them to create rendered images or videos. In many 3D modeling programs, one of the more difficult tasks is adding any pipes that you need in the building model. Fortunately, Google SketchUp comes with an innovative function that makes this process ridiculously quick and simple.
Difficulty:
Moderate
Instructions
1
Open Google SketchUp. Select "File" from the menu and click "Open." In the dialog box that pops up, browse to the file you have been working on and open it. (See Resources to download SketchUp.)
2
Select the primary model itself in the view. Since you will be placing the pipes inside the building, you need to hide it for the time being. Click on "Windows" and click "Layers." In the dialog box that pops up, click on the "New Layer" icon. Select the new layer. Then turn off the visibility of the other layers.
3
Select the "Line" tool from the toolbar. Use it to draw the lines for the pipes. Hold down the middle mouse button to rotate the scene as you work. This lets you turn the line of the pipe along any of the three axises, referencing the plans you are using and the numerical display in the lower-right corner to make sure you are getting them right.
4
Select the "Elliptical" tool from the toolbar. Click near one end of the pipe. Draw out the circle until it is the width you want for the pipe.
5
Select the "Follow Me" tool from the toolbar. Use it to extend the circle you drew along the length of the pipe. You may have to rotate the view if the tool gets stuck in a corner, but it should easily make all the turns you need. When you are done, switch to the select tool and delete the line you drew inside the pipe. Now, just "Unhide" the layer in the "Layers" panel.
Pipe is an integrated part of any construction may be it architectural or mechanical or electrical. Why is pipe important for any project? Pipe ensures that individuals working in the facility are aware of what pipes are carrying as well as any potential hazards associated with the pipe contents. It is clearly self-evident that well-planned and professionally managed pipe transportation networks are a must for the oil, chemical and gas industries, as well as for those industries that make regular use of these products. This is also applicable for your home or industrial buildings.
Fortunately, there are many different shapes and sizes of pipe fittings to construct almost any pipe network, with customized options available for very unusual pathways. There are also many types of pipe flanges and other connecting mechanisms to ensure a secure seal at corners and other joining sections along the network. Understanding whether different types of pipe fittings are compatible with one another, and whether particular types of connections are the most secure and appropriate to carry particular types of substances does however require proper planning and designing. And 3D design of SketchUp will help you in this section.
Here you can get 3D design of various types of pipe like; 3D Half Pipe Model in SketchUp, Cross Pipe in SketchUp, Curved Metal Pipe Bicycle, Curved Pipeline Model, Cylindrical Red Tile Pipe, Exhausts Twin Turbo Pipe, Flange Connected Pipe, Green Warp Pipe in SketchUp, Highly Detailed Half Pipe, Pipe and Bicycle Wheels, Pipe Railing for Doors, Advanced Curved Pipe, PVC 40 Components Pipe, Railing Pipe, Secure Hill Pipe and many more.
via:http://news.sketchucation.com/3skeng-pipe-now-available-for-mac/ The piping system plug-in 3skeng Pipeintroduced for Google SketchUp last month, is now also available for the Mac. The announcement was made today on the SketchUcation Community Forums here.
More information can be found at the 3skeng website. Short URL: http://news.sketchucation.com/?p=622
Posted by Csaba Pozsárkó on May 21 2009. Filed under Plug-ins. You can follow any responses to this entry through the RSS 2.0. Both comments and pings are currently closed.
=========================================
via:http://www.penturners.org/forum/showthread.php?t=49308
We drew the entire shop in sketchup first to plan the dc pipe layout.
This user story comes from Mark Lessmueller at Daniel Company. It came in via the Tell us your story link on the Sketchup Go Green! site.
Daniel Company has switched to Sketchup Pro for the drafting, design, analysis and construction of its air pollution control systems. Sketchup Pro has helped us visualize potential problems in 3D, allowing us to find conflicts on the computer, rather than in the field. This prevents us from wasting material and resources and reduces our carbon footprint. In addition, we can share our drawings and models with anyone across the globe. They can make suggestions directly on the drawings without having to resort to awkward phone conversations about “what change needs to be implemented where”.
This simplicity allows our clients to ensure that there are no intersections with existing equipment onsite during modifications. Additionally, due to the low cost of Sketchup Pro (especially in comparison to similar products), we were able to install Sketchup Pro on virtually all of our engineering computers, rather than just the drafters’ machines. The ability for our engineers to do some of our drafting when the drawings are “bottlenecking” production has proven invaluable.
We are about to begin start-up of the first system we created with SketchUp: a biological system where microorganisms digest the odorous pollutants. The system relies entirely on wastewater treatment plant products to feed the bacteria, rather than the typical method of spraying highly reactive neutralizing chemicals into the polluted airstream. The resultant waste of the bacteria can then be conveyed back into the wastewater treatment plant and treated via the microbes in that system.
SketchUp model details
While the air pollution control system was originally conceived by the treatment plant's design consultant engineer, the actual odor control system manufacture was drafted, designed, analyzed, and constructed using Sketchup and LayOut. This includes an air conveyance system, hydraulic profiles, plumbing layouts, water control panels, two 12' Ø x 40' tall fiberglass reactors, and two 12' Ø x 20' tall fiberglass adsorbers. (Each of the 12' Ø vessels was made in our shop in accordance to the LayOut files.) As the system is starting up, we are also planning to visualize this model in Google Earth.
Water Control Cabinet Concept Model. This model was used to visualize the size of the water control cabinet, as well as feasibility.
Each of the pieces of the ducting (which supplies fresh air to the building and captures the foul air) was modeled in SketchUp and then turned into a cut sheet. Our fiberglass duct, tank, and scrubber shop easily fabricated the individual pieces. Thanks to Sketchup, it is a lot easier to make sure that each piece will fit on a truck (sent from California to Virginia), rather than relying on 2D drafting.
Water Control Cabinet Construction Diagram. Illustrative table to show the flow diagram for the water control cabinet and estimate pressure losses.
Since this was our first major project in SketchUp, most of it was created using the standard SketchUp tools. The plugins we did use were mostly custom modifications of plugins that were available for alteration. The CenterPoint and Conetop plugins were used to help make pipe transitions and to align pipes. We modified the Mesh Additions and the Parametric scripts to create an “elbow tool”. The PVC piping in the water panels was created with a combination of native SketchUp tools, this “elbow tool” plugin and the CenterPoint plugin.
Air Pollution Control Biological Scrubber External Sump - Model Concept Drawing. This illustration shows where rough nozzle placement would occur. The vessel nozzles were rough, and the gussets inaccurate, but this illustration was good enough to ensure that a conceptual model was feasible.
Air Pollution Control Biological Scrubber External Sump - For Construction Drawing. This layout drawing shows the more accurate renderings, the additional nozzles required, and the steps taken to create an FRP vessel for construction.
Since this project, we have created multiple other air pollution control projects using SketchUp and LayOut. We’ve also used quite a few other freeware plugins. (We’re big fans of Fredo6 and Chris Fullmer’s plugins). FredoScale and Joint Push Pull have saved us on a number of more delicate projects, especially where we make a small apparatus and then need to show thickness in the ducting, or building our damper library. And Chris Fullmer's Shape Bender has helped out quite a bit for other jobs where nothing else seems to work.
We’re now working to model some of our older existing projects in SketchUp and visualize them in Google Earth.
Overall component setup. This setup illustrates how each of the vessel components and scrubbing systems connected for a proper system.
I am trying to work up a new layout for my shop using Sketchup, and I am really close to where I want to be. However I am having difficulty with the dust control system layout. Every time I try to rotate a pipe segment, I get angles I do not want, say I want to rotate simply on the X axis, but I end up with rotation on Y and Z axis as well... How do I constrain rotation of an object along a 2d plane so I can rotate a pipe a simple 90 degrees?
the easiest way is to hold the shift key when you get on the Helper lines(red, green, Blue lines). when you see that your going in the right direction hold the shift key and then that is the plane you will move in no matter what.
The way i do pipes is in this way. it is easy and fast. you have to use the follow me tool, if you don't have a button out for it you can find it in the tools section underneath the push me tool
the first thing you do is draw your layout of where you want the pipes to go, using just one line. this is the line that the "follow me tool" will use or follow. I usually use the center line of the pipe. Then you put in a radius for it to follow. it doesn't need a radius as this tool will bend anything do with it. I'll put up another example in a minute.
after you have all the lines drawn of where you want it to go and the radiuses are in then you put a circle, or square(house heating ducts) or whatever shape you want to have follow that line.
Then select the follow me tool and you use it in the same way as the push/pull tool only you follow the line and watch the magic happen. You can stop at any point as i showed you, but if you stop on a radius sometimes you can't keep going so i always stop on a strait run. That way i can make it longer if i need to.
here is my example of how the follow me tool will use any shape and follow it on any line. weather or not there is a radius
Here are some random shapes that i made and the one on the far right is one i just drew to show you that it really can be ANY shape. And the line that it will follow is kinda random also the last bend is not 90* its just one that i drew. as you can see it will follow any line with any shape and put all the lines in the right spot to get around the angles. you can even use these weird shapes to go around radius's.
Let me know if you have any more questions about sketchup. I have played with it for many hours and watched i don't know how many videos on it so i hope i can help. I also have the book Sketch up for dummies which is very good. I could look stuff up in there if you need help
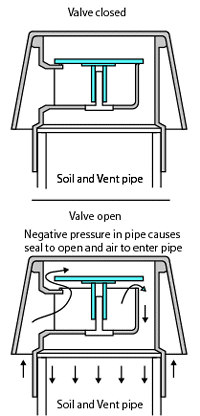
Air admittance valves (also referred to as Durgo valves) are used to provided internal venting for soil and ventilating stacks - this can either be within rooms or the roof space. One great advantage of air admittance valves is that they remove the need for holes through the roof or external walls. They use also reduce the amount of pipework needed to fit an external, open soil or ventilating stack.
The air admittance valve incorporates a sealing diaphragm which under its own weight or slight spring pressure is normally held closed, thus sealing the foul air within the pipework - see diagram right.
When an appliance discharges into the drain, a slight negative air pressure is produced in the drain pipework which lifts the sealing diaphragm and allows air to be drawn in - see right lower. This intake of air equalises the air pressure and the sealing diaphragm falls back sealing the valve. The inrush of air through the open valve prevents the foul air in the pipe from escaping into the room/roof space and prevents the water seals in traps along the pipework from being broken.
An air admittance valve must be installed so that it is positioned above the highest flood level of the appliances fitted to the pipe - that is to say, where a washbasin is connected to the pipework, the air admittance valve must be higher than the overflow of that basin. This is to ensure the correct operation of the air admittance valve, otherwise there is a risk that the water seal in the basin's trap may be broken.
The use of air admittance valves are governed by building regulations (Part H) and they cannot be used in all situation, these regulations should be checked before specifying the use of an air admittance valve - generally speaking, within a normal, two storey house with an existing vent pipe, there will be no problem; fitting within a taller building or a block of flats may be problematic.
Air admittance valves are easy to fit, some incorporate seal rings which seal against the inside of the pipework, other valves just slip onto the top of the vertical pipe. The two main constraints when fitting Air Admittance Valves are:
They can only be fitted to vertical pipework - turning the valve on its side will mean that the seal won't work.
They should only be fitted within a building to avoid the risk of them freezing during winter frosts. Most air admittance vales are supplied with a formed polystyrene moulding, which should be fitted to the valve top after installation in an unheated roof space to provide added protection from frost.
Problems can arise where air admittance valves are fitted to vent pipes which are not separately vented and which include water traps - this can lead to back pressure in the pipework when an appliance is discharged which will effect the appliance discharge - this will be especially noticeable when a toilet is flushed.
Air admittance valves do not need any maintenance but can cause problems if they become faulty as they may allow sewer gas into the building.
A few years ago we had a durgo valve fitted in our family bathroom (built in next to the sink unit and boxed in) to free up the space taken by the original vent pipe.
Since then we have had the intermittent problem of a foul smell in the bathroom which is gradually occurring more and more.
Since my children left home this bathroom is not in daily use.When the smell occurs (at least once a week) I have checked and it is not coming from the bath, bidet, sink or WC as far as I can tell.If I flush the appliances it does not seem to make any difference. Does this sound like a faulty durgo valve or is there another likely cause?
Also the valve is below the basin waste height, being under the counter top.Is this OK?
Posted: Wed Nov 07, 2007 7:12 pmPost subject: durgo smell problem
By the nature of durgos ( automatic air admittance valves ), they should not be fitted as an alternative to natural ventilation, as they are not ventilation at all. Unless faulty they don't smell. If the spring goes they smell something rotten, and allow methane into the room. Not nice at all.
As for the height they should be fitted, the manufacturers stipulate they should be fitted above flood level.
Some plumbers like to fit them one metre above FFL ( finished floor level ), but if the water is getting that high, its been coming out over the toilet for some while, so in theory they only need to be some short distance above the rim of the WC. As just about every WC measures 16" ( except disabled suites , 18" ), 20" should be enough[/i]
Your problem with bathroom smell and the installation you describe is almost exactly the same as ours.
The main difference appears to be that we notice foul smell mainly first thing in the morning, not during the daytime.
I would be very interested to know what you have actually done to try to eliminate the smells and to what extent you have been successful.
My thoughts at the moment tend towards having the vent pipe directed horizontally through the wall (below worktop height so that it is still not visible from inside the bathroom) and then up the wall to terminate above eaves level.
I am still trying to get the original plumber/installer in to look at the problem and get his observations.


 The piping system plug-in


 Sketchup advice needed.


